
Prima fase: fustello i due passaggi dei montanti e cucio la fibbia coi suoi passanti.
 Poi assemblo l'imbottitura, più o meno come ho fatto per il frontalino...
 ...cucio assieme le due parti...
 ...e finisco il capezzino applicando i due montanti.
 Giunti a questo punto, misuro e fustello i fori sulle varie parti: sovracapo, capezzino e montante del capezzino.
 Segue la fase di finitura, che consiste nel rimuovere eventuali residui di colla, applicare la tinta nera dove ce n'è bisogno, ingrassare, cerare e lucidare il tutto.
Alla fine, dopo una ventina di ore di lavoro, la testiera si presenta così:
 Dettaglio del frontalino...
 ...e del capezzino.
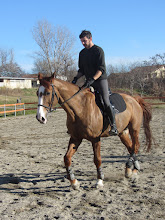
 Spero di poter pubblicare presto le foto della testiera in uso!


CIao mi piacerebbe poterti contattare in private per delle domande ..... come posso fare?
ReplyDelete